
It appears that your cart is currently empty
When different adapter is used, since the voltages are different, it will burn your unit. It is very crucial that you use our adapters for our products only.
Please contact us immediately.
It appears that your cart is currently empty
Features
Specification
FAQ
Tech Profile
Download
Resources


Multiwave LED Curing Light
Cybird Gold has ergonomic compact design that fits perfectly in hands for everyone. It features NEW Dual Band LED which is compatible for most resins, improving inconvenience of carrying 2-3 curing lights for each different type of resin.
Cybird Gold generates low heat and still maintains high intensity for efficient curing. Also, Cybird Gold helps doctors to reduce chair time caused during the treatment with 1 short polymerization cycle.

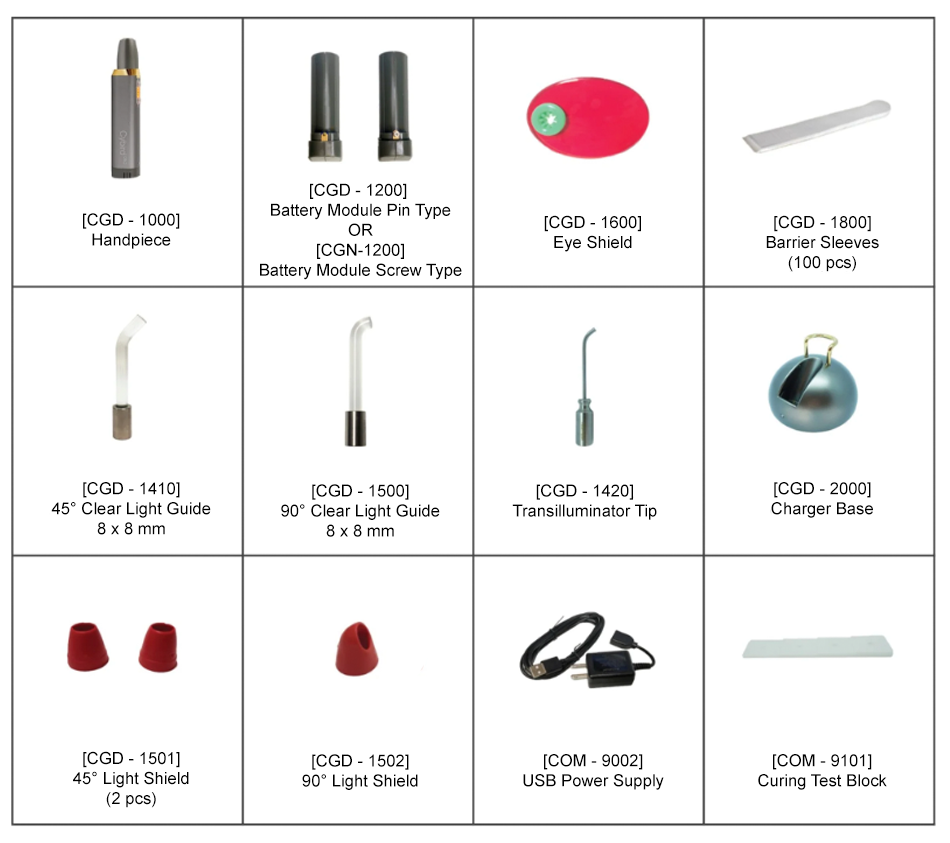
3 complimentary light guides are included
(Transilluminator tip, 45°, 90° light guides)
3 Curing Modes
Gold High Power Mode Intensity (1,500mW/cm²)
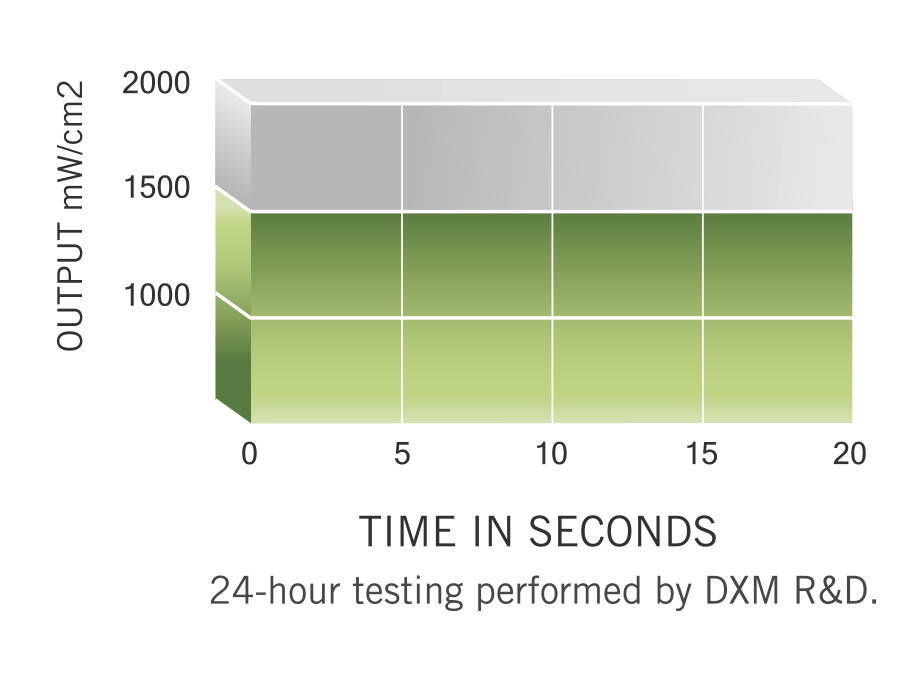
Appropriate for most applications
- Restorations for resins, liners, sealant, and bases
- Indirect restorations such as veneers, inlays/onlays
and crowns
Gold Plasma Mode Intensity (2,500mW/cm²)
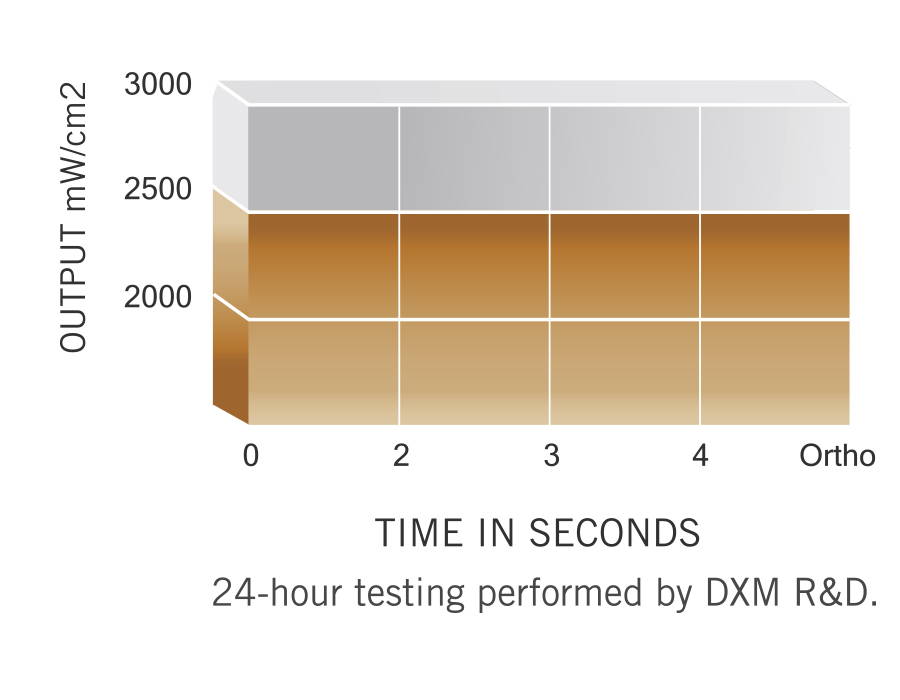
Emulated plasma arc equivalent light intensity for
rapid curing and orthodontic bonding
- 2 seconds cure for most 2mm depth composites
- Orthodontic bonding of ceramic/metal brackets,
tubes, and bands
Design Upgrades
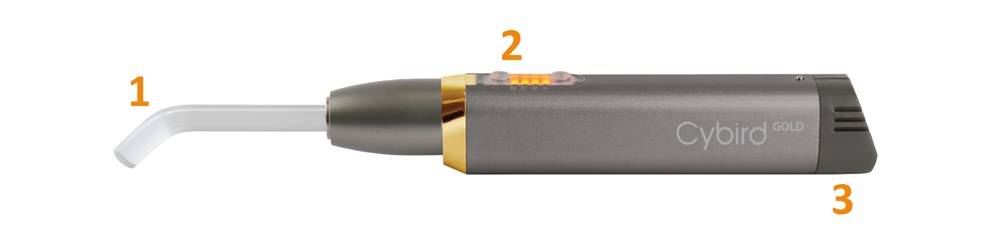
1. 8mm fiber-optic light guide
The premium low profile fiber-optic light guide greatly improves the Gold's light emission and access for posterior procedures
2. Intuitive button control / LED Display
The newly improved silicone dual control button allows to change the device settings and precisely displays various conditions of the Cybird Gold such as battery level indication, mode selection and time duration
3. Enhanced battery module
A high performance lithium-ion cell is incorporated into our special
medical-grade battery module guarantees extended battery life
New Features
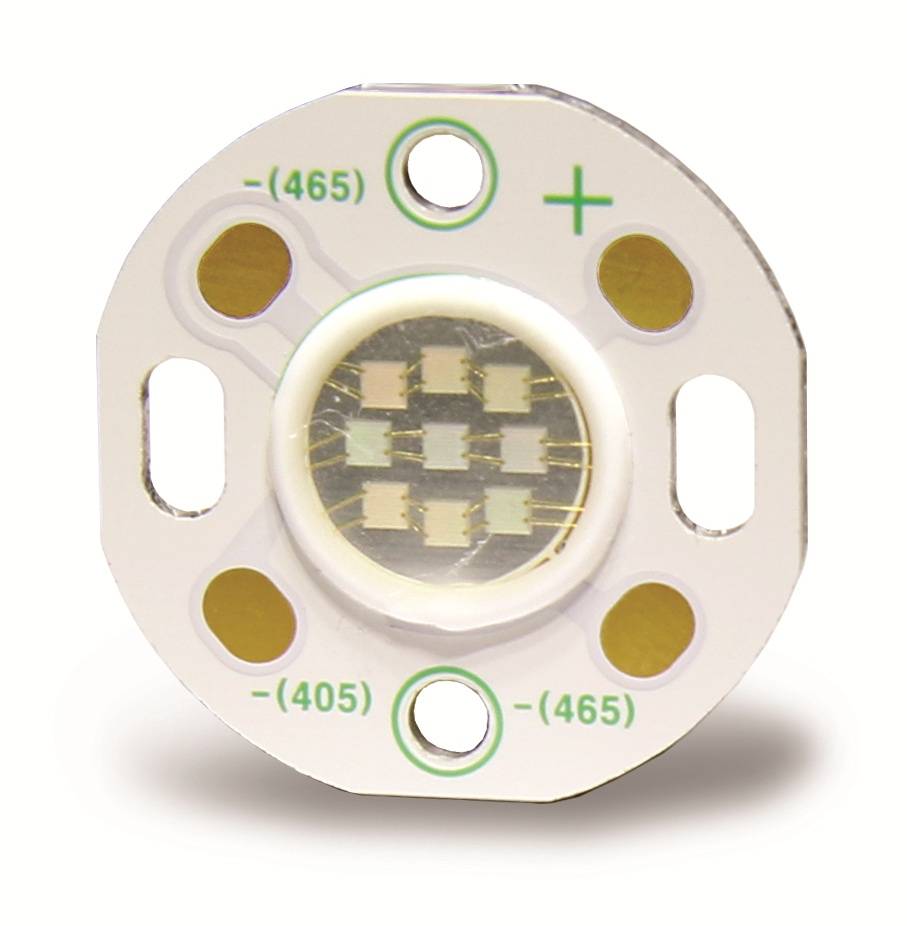


9-Chip LED
Maintains stable light output & minimizes heat generation, improving LED circuit
Wavelength
More compatibility with most resins (400nm~490nm)
Lower Temperature
Generates low heat & still maintains high intensity for efficient curing
Related Products
Wavelength
400 ~ 490nm
Irradiance Intensity
High Power Mode = 1,500 mW/cm² (5,10,15,20 sec.)
Plasma Emulation Mode = 2,500 mW/cm² (2,3,4 sec.)
Ortho Mode (16 times of 3 sec. at 2,500 mW/cm²)
Dimensions
Handpiece = 150 x 30 x 22.6 (mm)
Charger Base = 120 x 120 x 85 (mm)
Charging Time
2 hours
Operation Time
High Power Mode, 10 sec. x 300 (when fully charged)
Warranty
2 Years
FAQS
Charger has a burning smell
Battery pins / Charger pins are corroded and will not charge
Pins corrode due to too much sterilization. Any liquid left from sterilization will cause corrosion.
Make sure to have the unit dry after sterilization.
Cleaning Instructions
Cleaning and Disinfection Instructions must be followed after each use.
Suggested Surface Disinfectant:
- CaviCide®(or equivalent quaternary/alcohol blend disinfectant)
Do NOT Use:
- Glutaraldehyde
- Denatured alcohol
- Lysol®
- Phenol or phenolic cleaner
-Ammonia complex
-Iodine complex solutions
Disassembly and Inspection:
1. Remove elastomer rubber light shield from glass fiber-optic light guide.
2. Remove light guide from handpiece by gently pulling it straight out. Examine light guide ends for damage or composite material adhering to the tip. Examine light shield for tears or distortion. Replace if any damage is noted on either component.
Handpiece and Charger Base
Cleaning:
1. Initial cleaning of handpiece must begin immediately after use to prevent drying of soil and contaminants in and on the device
2. All exterior surfaces of the handpiece and charger base may be wiped with CaviWipes® or a cloth soaked in surface disinfectant to remove gross soil. Do not allow cleaning solution to invade the interior of these components since this may adversely affect the electronics.
Disinfecting:
1. All exterior surfaces of the handpiece or charger base must be wiped and wetted with CaviWipes® or a cloth soaked in surface disinfectant.
2. Allow the CaviCide® surface disinfectant to reside of the surface for a minimum of 3 minutes. Do not allow the disinfectant to dry on the surface.
Drying:
1. Use a clean dry cloth to dry the exterior surfaces. Do not allow fluids to accumulate in the charger base socket as this may adversely affect the electronics.
Light Guide (Fiber Optic Glass)
Cleaning:
1. Initial cleaning of the fiber optic light guide must begin immediately after use to prevent drying of soil and contaminants in and on the device.
2. All exterior surfaces may be wiped with CaviWipes® or a cloth soaked in surface disinfectant to remove gross soil. Use a soft brush to remove contaminants in the junction between the glass rod and metal ferrule if necessary.
3. Clean thoroughly using an ultrasonic cleaner. Minimum cycle time 10 minutes.
Rinsing:
1. Using clean tap water on a clean cloth, wipe away residual disinfectant
Sterilizing:
Package in an FDA cleared wrap prior to sterilization. Sterilization can be performed in gravity autoclave at 132° C / 270° F for 15 minutes with a 15-30 minute drying time.
Light Shield (Elastomer Rubber)
Cleaning:
1. Initial cleaning of the light shield must begin immediately after use to prevent drying of soil and contaminants in and on the device.
2. All exterior surfaces may be wiped with CaviWipes® or a cloth soaked in surface disinfectant to remove gross soil. Examine the light shield for damage and discard if any cuts, tears, or distortion is noted.
3. Clean thoroughly using an ultrasonic cleaner. Minimum cycle time is 10 mins.
4. The elastomer rubber light shield can be cleaned, sterilized and reused up to 5 times, discard after that.
Rinsing:
1. Using clean tap water on a clean cloth, wipe away residual disinfectant.
Sterilizing:
Package in a FDA cleared wrap prior to sterilization. Sterilization can be performed in a gravity autoclave at 132°C / 270°F for 15 mins. with a 15-30 min. drying time.
Reassembly & Storage
1. After all parts have been allowed to dry completely, gently insert the metal end of the glass fiber optic light guide into the circular opening of the handpiece. Make sure the light guide is completely inserted until it stops. This will position the light guide properly with the internal LED light source.
2. Insert an elastomer rubber light shield over the end of the fiber optic light guide.
3. Store the reassembled Cybird Curing light in a clean, dry location, preferably on the Cybird charger base so that the battery will be completely charged prior to the next use.
Inside Dentistry Tech Profile
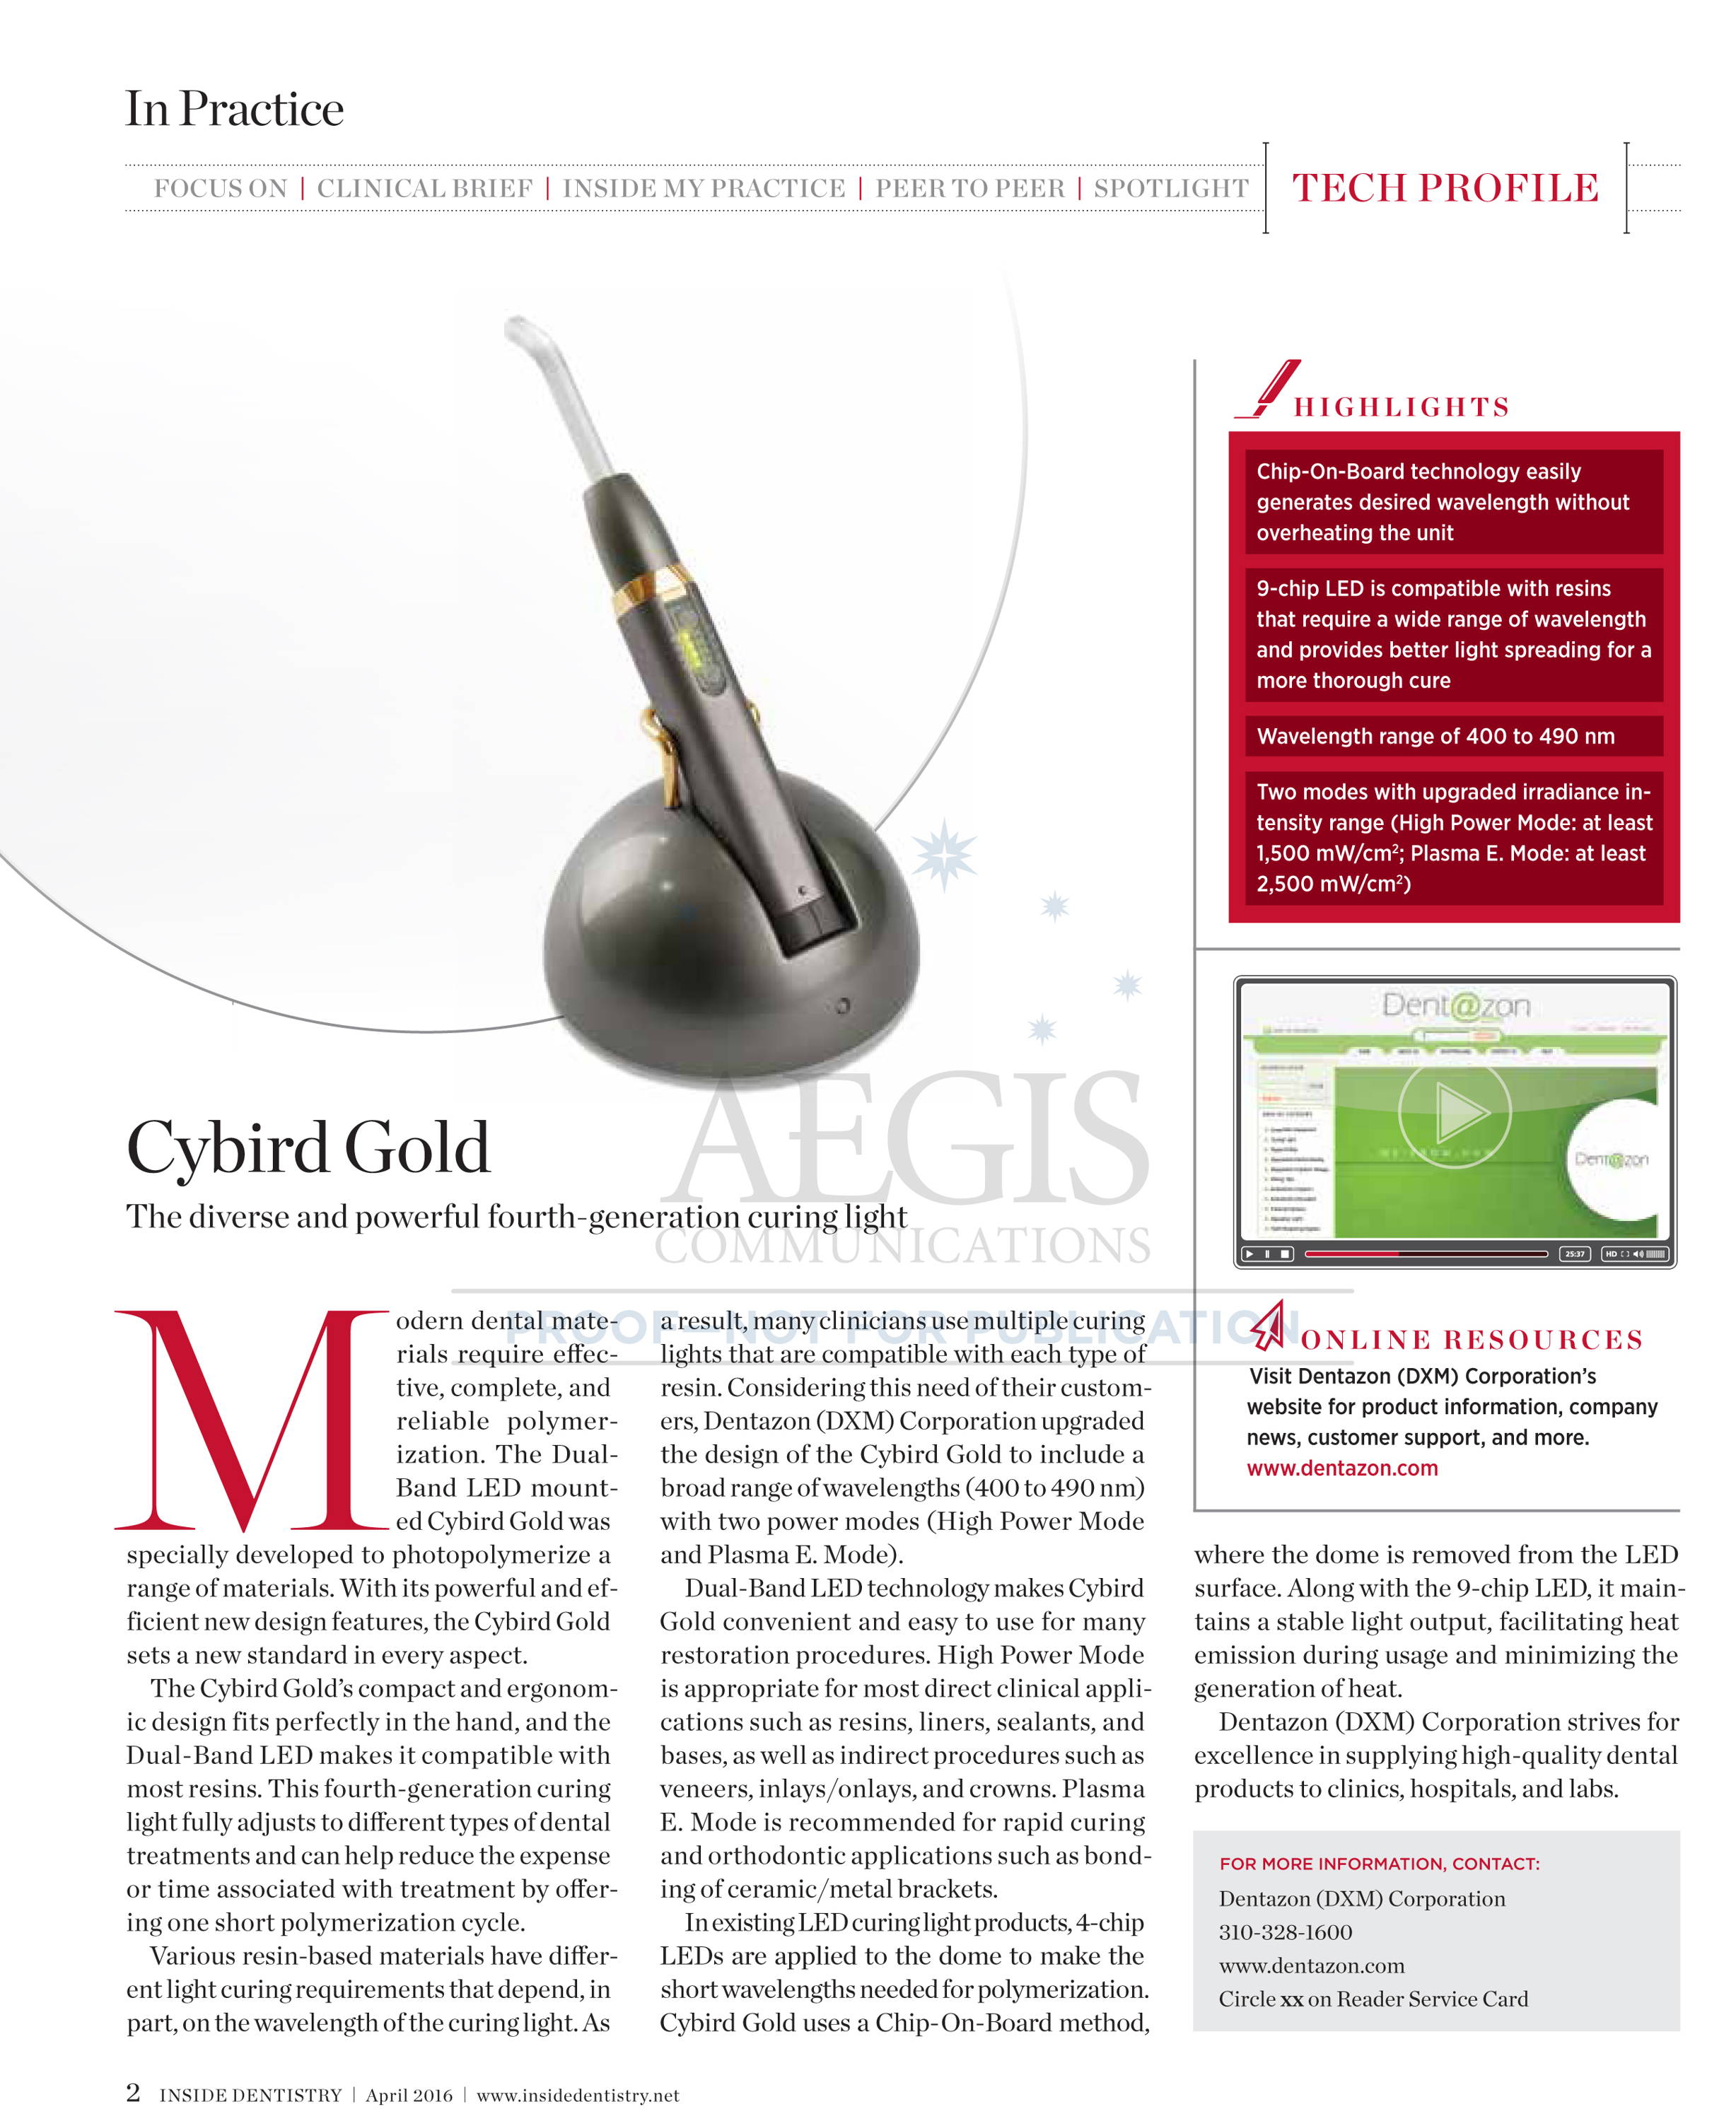
This “Dual Band LED Curing Light” Cybird Gold is specially developed to polymerize a wide range of materials.
This fourth-generation curing light fully adjusts to different types of dental treatments and can help reduce the expense or time associate with Treatment by offering one short polymerization cycle.
The Cybird Gold’s compact and ergonomic design fits perfectly in the hand, and the Dual-Band LED makes it compatible with most resins.
Inside Dentistry, April 2016
High-Irradiance Light Curing, Depth of Cure, and Pulpal Temperature
Study: Effect of High-Irradiance Light Curing on Exposure Times and Pulpal Temperature of Adequately Polymerized Composite
Authors:
William E Slack, Advanced Education in General Dentistry
Erin M Yancey, Advanced Education in General Dentistry
Wen Lien, USAF Dental Research and Consultation Service
Ryan Sheridan, USAF Prosthodontics Residency
Rodney Phoenix, Postgraduate Dental College, Uniformed Services University of the Heatlh Sciences
Kraig Vandewalle, Advanced Education in General Dentistry Residency, Uniformed Services University of the Health Sciences
Journal: Dental Materials Journal 2020; 39(6): 976–983
Publication Date: December 2020
Product Used: Cybird™ XD
Summary: This in vitro study compared high-irradiance curing lights, including Cybird™ XD, Valo, S.P.E.C. 3 LED, and Flashmax P3. The study found that the manufacturer-recommended short exposure times did not adequately polymerize the tested composite at a 2 mm depth. Under the study protocol, Cybird™ XD achieved adequate polymerization at 2 mm after 9 seconds. The pulpal temperature increase at this experimental exposure time remained below the threshold associated with possible pulpal injury.
Result Highlight: Cybird™ XD achieved adequate 2 mm polymerization at 9 seconds in this study, with pulpal temperature increase remaining below the cited safety threshold.
Dental Radiometer Accuracy Study
Study: On the Inaccuracies of Dental Radiometers
Authors:
Adrian C Shortall, College of Medical and Dental Sciences, Institute of Clinical Studies, University of Birmingham, Birmingham, United Kingdom
Mohammed A Hadis, College of Medical and Dental Sciences, Institute of Clinical Studies, University of Birmingham, Birmingham, United Kingdom
William M Palin, College of Medical and Dental Sciences, Institute of Clinical Studies, University of Birmingham, Birmingham, United Kingdom
Editor: Fabian Huettig, Eberhard-Karls-Universitat Tubingen Medizinische Fakultat, GERMANY
Journal: Public Library of Science ONE (PLOS ONE) 16(1): e0245830. https://doi.org/10.1371/journal.pone.0245830
Publication Date: January 2021
Product Used: Cybird™ XD
Summary: This study evaluated the accuracy of commercial dental radiometers when measuring LED light-curing units, including Cybird™ XD. The authors reported substantial discrepancies between radiometer readings and gold-standard integrating sphere measurements, showing that dental radiometers may not reliably estimate actual light output for all curing lights.
Result Highlight: The study supports the importance of accurate light-output measurement methods when evaluating curing-light performance.
Translucency Testing of Zirconia and Hybrid Ceramic Crowns
Study: Translucency of Zirconia and Hybrid Ceramic Monolithic Crowns
Authors:
P Baldissara, Dental School, University of Bologna, Bologna, Italy
C Mazzitelli, Dental School, University of Bologna, Bologna, Italy
T Maravic, Dental School, University of Bologna, Bologna, Italy
U Josic, Dental School, University of Bologna, Bologna, Italy
V Wandscher, Dental School, University of Bologna, Bologna, Italy
L Breschi, Dental School, University of Bologna, Bologna, Italy
Journal: Dental Materials Journal 2023; 39(1): e12
Publication Date: August 2023
Product Used: Cybird™ Gold
Summary: This dental materials study evaluated translucency of zirconia and hybrid ceramic monolithic crowns using white light and blue light transmission testing. A DXM Cybird™ Gold lamp was used for the blue-light transmission measurement. The study found differences in translucency depending on material type and sintering protocol.
Result Highlight: Cybird™ Gold was used as a blue-light source in translucency testing of ceramic and hybrid ceramic crown materials.
※ Summaries are based on the cited articles. All rights to the original article belong to the authors and/or publisher. Product names and trademarks mentioned in the cited studies belong to their respective owners.