
It appears that your cart is currently empty
When different adapter is used, since the voltages are different, it will burn your unit. It is very crucial that you use our adapters for our products only. Please contact us immediately
It appears that your cart is currently empty
Features
Specification
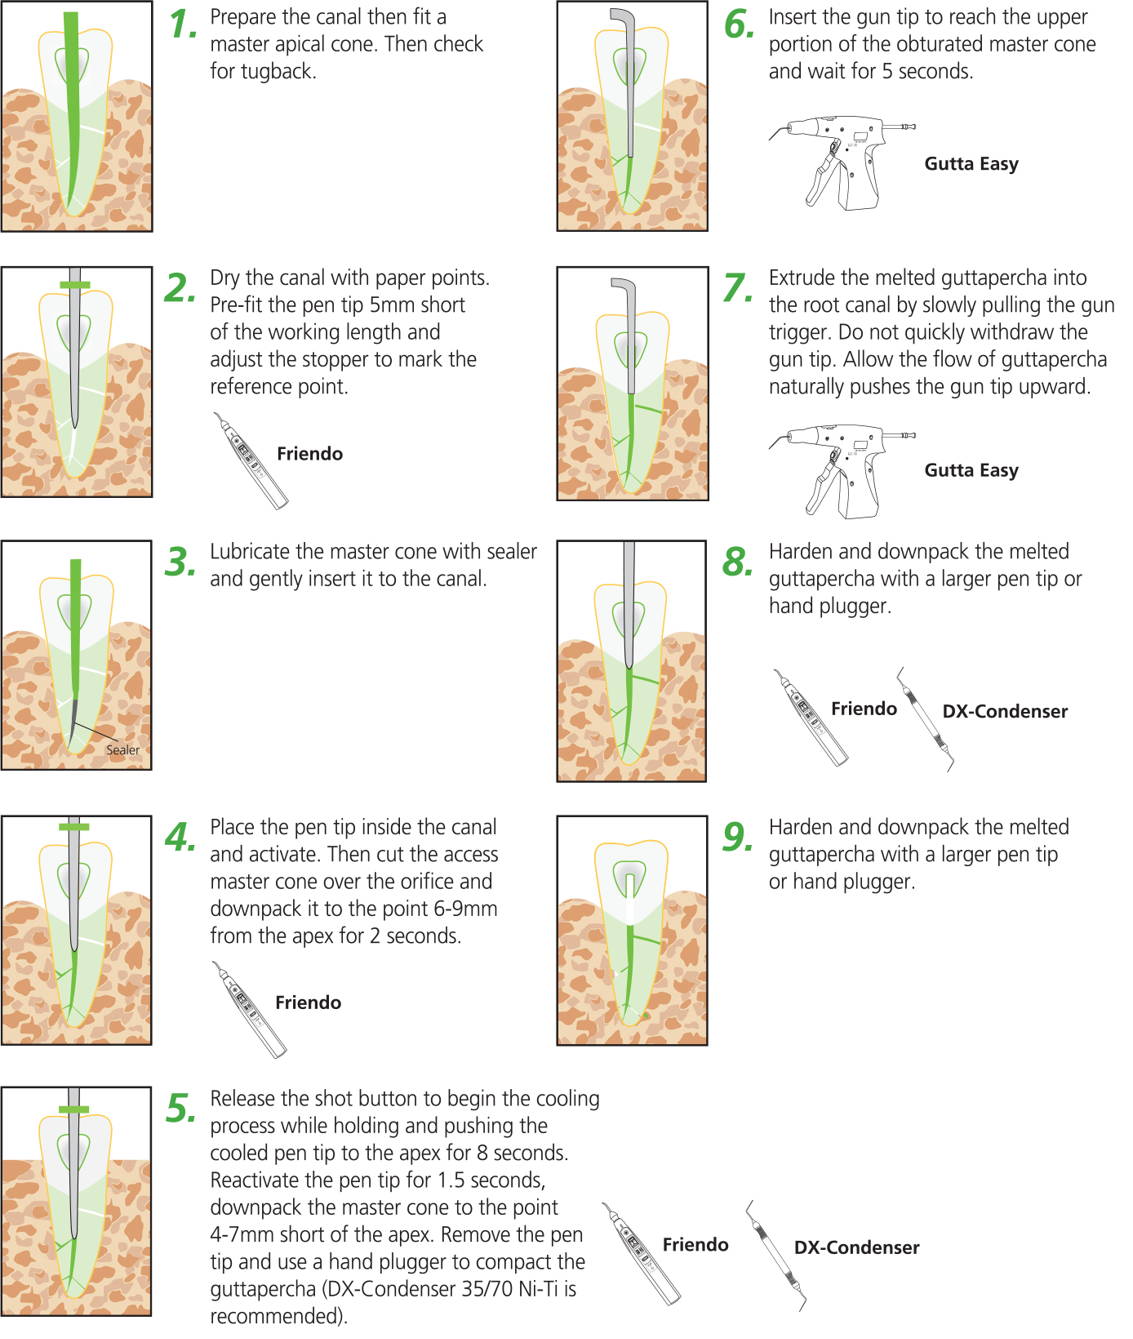
Clinical Procedure
FAQ
Download
Resources

The Gutta Easy is the highly efficient gutta percha back fill obturation device. With its distinctive and inimitable features, the Gutta Easy makes thermo-plasticized root canal obturation much easier and faster than ever. The Gutta Easy's powerful and rapid heating control mechanisms delivers reliable and optimum clinical results.
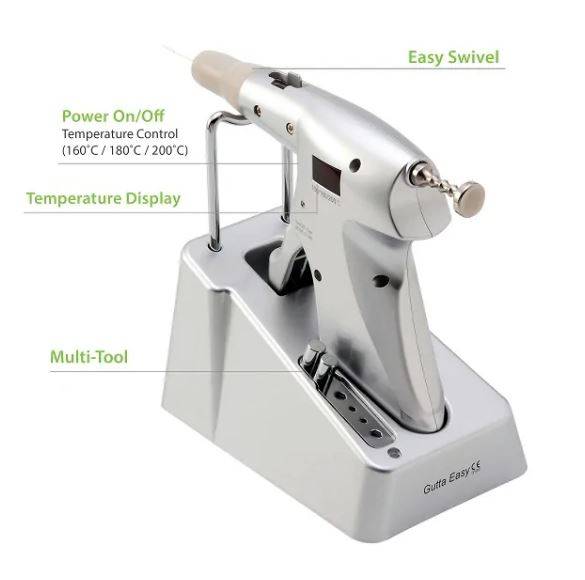
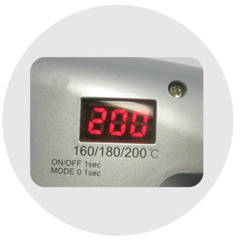
3 Temperature Settings & Fast Heating Speed
160°C / 180C° / 200°C
Takes only 23 sec. to reach 200°C
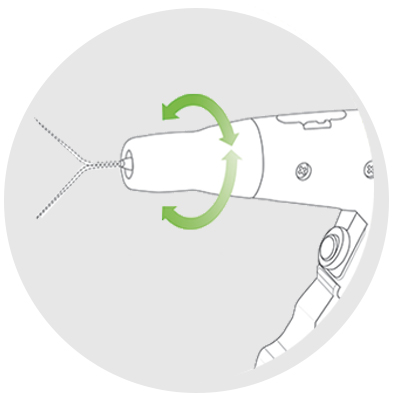
360° Swivel
Provides better access to root canals
WIPO PATENT: PCT / KR2009 / 003683
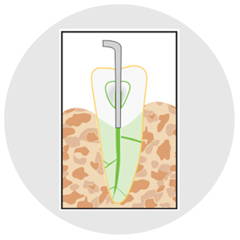
Easy Back-fill
Reduces hand and wrist fatigue and
adds more precision to reaching canals
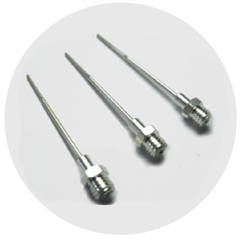
Available tip sizes : 23G / 25G
Comes with 2x 23G , 1x 25G
Related Products
Specification
Friendo (Pen)
Gutta Easy (Gun)
Operating Time
3 sec. shot x 100
1 hr. and 45 min.
Operating Temperature
170°C/200°C/230°C
160°C/180°C/200°C
Charging Time
2 hrs. and 30 min.
2 hrs. and 30 min.
Weight
68g (2.3oz)
200g (7oz)
Charger Weight
453g (15.9oz)
200g (7oz)
Charger Input Power
AC 100~250V, 50~60 Hz
Charger Output Power
6V DC, 2.5A
Warranty
2 Years (1 Year for Battery)
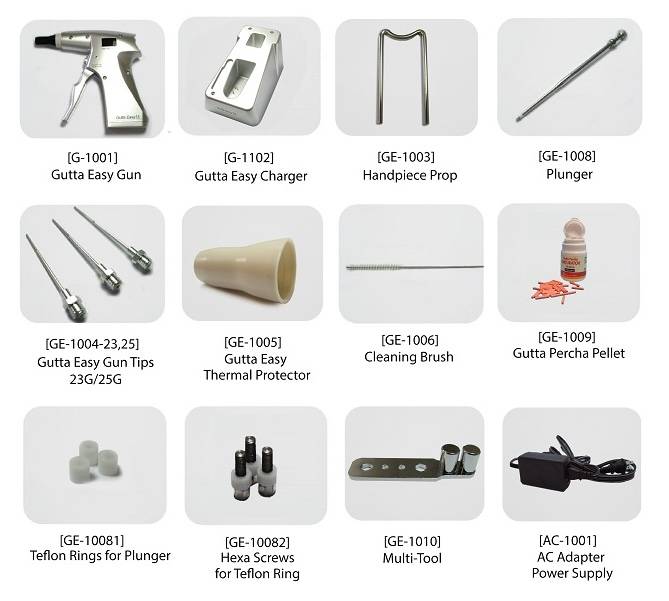
Components
A training video which explains how to use the Endo-Apex dual obturation system from DXM step by step.
This video covers the entire vertical condensation and back fill obturation procedures.
FAQS
Charger has a burning smell
Battery pins / Charger pins are corroded and will not charge
Pins corrode due to too much sterilization. Any liquid left from sterilization will cause corrosion. Make sure to have the unit dry after sterilization.
Friendo Pen is not turning on
This is the most common complaint that we receive from the customers.
Almost 98% cases are due to lack of charging.
Please keep the unit charged at ALL TIMES for longer battery lifespan.
Why does my Friendo Heating Condensation Pen stop heating after a few seconds?
The heating stops after 3 seconds and activates again after a short pause because we have upgraded our software to prevent any burns with longer heating cycle during the treatment for patient safety.
My Gutta Easy obturation gun shows “Er1” "Low". What does this mean?
“Er1” shows on LED display when the heater is in a bad contact with the PCB inside. Hold the Gutta-Easy Gun Body steady while rotating the heating end at least 360° to realign the PCB's contact with the heater. If the device still displays "Er1", please request for an inspection.
"Low" show on LED display when there is no battery, please charge the battery.
My Gutta Easy obturation gun does not turn on. What should I do?
If the gun was not charged, charge it, and try turning it on again.
Also, try the reset button on the bottom of the handpiece. Press the square button. Once pressed, it will click in. Leave it for few seconds and press it again. Unit will turn on. If it still doesn’t turn on, please request for an inspection.
Gutta percha pellet is stuck in my Gutta Easy obturation gun and does not work
Please request for an inspection. Our repair department would have to disassemble the unit and remove the pellet inside.
To prevent this from happening, please use 1 pellet at a time. Do not use 2. Once the pellet is inserted, insert the plunger pushing towards the mouth of the handpiece.
Also, make sure the plunger has the white o-ring (Teflon Ring) in place. Without Teflon Ring, Gutta Percha Pellet can move incorrectly and get stuck inside device.
Cleaning Instructions
Internal Cleaning of Hand Piece:
1. Remove the thermal protection cover.
2. Unscrew the gun tip counter clockwise to remove.
3. Turn on the device and set to 160°C.
4. Teflon cleaning brush is required for heat chamber cleaning.
5. Insert the cleaning brush to the plunger insertion hole and push it all the way through.
6. Grab and pull out the cleaning brush.
* Repeat steps 5 and 6 as needed
External Cleaning of Hand Piece:
1. Remove the hand piece from the charger.
2. Thoroughly clean the surface of the hand piece by wiping with a soft cloth dampened with disinfection solution not containing phenols.
3. Do not directly spray the disinfection solution or disassemble the hand piece for cleaning.
* Gun tip is disposable and cleaning is not recommended.
Cleaning of Charger:
1. Remove the hand piece from the charger and completely disconnect the power supply.
2. Gently clean the surface of the charger by wiping with a soft cloth dampened with disinfection solution not containing phenols.
3. Do not directly spray disinfection solution for cleaning.
Sterilizing of Thermal Protector and Gun Tip:
In a steam sterilization method
gravity displacement type : sterilization temp 121°C (250°F)
Time : 30 minutes, Drying Time : 30 minutes
WARNING
Do not use nonvolatile guttapercha remover or similar cleaning solution. Permanent internal or external damage may occur when improperly cleaned.
Do NOT Use :
- Glutaraldehyde
- Lysol®
- Ammonia complex
- Denatured Alcohol
- Phenol or phenolic cleaner
- Iodine complex solutions
Precautions:
- Do not use other pellet brands, MUST only use OUR BRAND.
- Do not use expired pellets.
- Replace all worn out/damaged Plunger Teflon Ring.
- Squeeze out the leftover pellet after each use.
- Clean thoroughly after each use.
Endodontic Filling Material Removal Study
Study: A Novel Ultrasonic Tip for Removal of Filling Material in Flattened/Oval-Shaped Root Canals: A MicroCT Study
Authors:
Melissa Esther Rivera-Peña, Universidade de São Paulo - USP, Bauru School of Dentistry Department of Operative Dentistry, Endodontics and Dental Materials, Bauru, SP, Brazil
Marco Antônio Húngaro Duarte, Universidade de São Paulo - USP, Bauru School of Dentistry Department of Operative Dentistry, Endodontics and Dental Materials, Bauru, SP, Brazil
Murilo Priori Alcalde, Universidade de São Paulo - USP, Bauru School of Dentistry Department of Operative Dentistry, Endodontics and Dental Materials, Bauru, SP, Brazil
Flaviana Bombarda DE Andrade, Universidade de São Paulo - USP, Bauru School of Dentistry Department of Operative Dentistry, Endodontics and Dental Materials, Bauru, SP, Brazil
Rodrigo Ricci Vivan, Universidade de São Paulo - USP, Bauru School of Dentistry Department of Operative Dentistry, Endodontics and Dental Materials, Bauru, SP, Brazil
Journal: Brazilian Oral Research, 2018 Aug 13;32:e88. doi: 10.1590/1807-3107bor-2018.vol32.0088. PMID: 30110086.
Publication Date: August 2018
Products Used: Friendo™ and Gutta Easy™
Summary: This microCT study evaluated protocols for removing filling material from flattened or oval-shaped root canals. Friendo™ and Gutta Easy™ were used during the root canal filling procedure before retreatment testing. The study found that using the ClearSonic ultrasonic tip followed by Reciproc resulted in the lowest percentage of remaining filling material in the whole canal and apical third.
Result Highlight: Friendo™ and Gutta Easy™ were used in the obturation protocol for this endodontic retreatment study.
Complex Dens Invaginatus Case Report
Study: Non-Surgical Endodontic Treatment of a Type III Dens Invaginatus With Large Perirradicular Radiolucency Using Bioceramic Materials
Authors:
Bárbara de Assis Marra, Universidade Federal de Uberlândia, Brazil
Alexia Mata Galvão, Faculdade Anhanguera, Brazil
Ana Clara Alves Araújo, Universidade Federal de Uberlândia, Brazil
Cristiane Melo Caram, Prática Privada, Brazil
Jessica Monteiro Mendes, Prática Privada, Brazil
Maria Antonieta Veloso Carvalho de Oliveira, Universidade Federal de Uberlândia, Brazil
Journal: Research, Society and Development, v. 13, n. 8, e0513846478, 2024 (CC BY 4.0) | ISSN 2525-3409 | DOI: http://dx.doi.org/10.33448/rsd-v13i8.46478
Publication Date: August 2024
Products Used: Friendo™ and Gutta Easy™
Summary: This case report described non-surgical endodontic treatment of a complex type III dens invaginatus case using CBCT, operative microscopy, bioceramic materials, and thermoplasticized obturation. Friendo™ and Gutta Easy™ were used during the obturation stage. The authors reported lesion reduction and bone formation during follow-up.
Result Highlight: Friendo™ and Gutta Easy™ were used as part of the thermoplasticized obturation protocol in a complex endodontic case report.
Plugger Temperature of Cordless Heat Carriers
Study: Plugger Temperature of Cordless Heat Carriers According to the Time Elapsed
Authors:
Hoon-Sang Chang, Department of Conservative Dentistry, Chonnam National University School of Dentistry, Gwangju, Korea
Se-Hee Park, Department of Conservative Dentistry, Gangneung-Wonju National University School of Dentistry, Gangneung, Korea
Kyung-Mo Cho, Department of Conservative Dentistry, Gangneung-Wonju National University School of Dentistry, Gangneung, Korea
Corresponding Author: Jin-Woo Kim, DDS, MSD, PhD. Professor, Department of Conservative Dentistry, Gangneung-Wonju National University College of Dentistry, 7 Jukheon-gil, Gangneung 25457, Korea
Journal: Restorative Dentistry & Endodontics. 2018 Feb 7;43(1):e12. doi: 10.5395/rde.2018.43.e12
Publication Date: February 2018
Product Used: Friendo™
Summary: This study measured plugger tip temperatures of cordless heat carriers set at 200°C, including Friendo™. The authors reported that plugger temperature was affected by both plugger taper and heat-carrier brand, and that clinicians should pay attention to temperature setting and activation time when using cordless heat carriers.
Result Highlight: Friendo™ was included in a comparative temperature study of cordless heat carriers, highlighting the importance of activation time and plugger selection.
※ Summaries are based on the cited articles. All rights to the original article belong to the authors and/or publisher. Product names and trademarks mentioned in the cited studies belong to their respective owners.